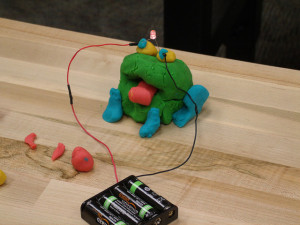
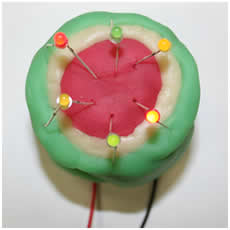
 I’m not sure this is actually e-learning but it’s the best bit of fun technology I’ve used for ages and at minimal cost. Basically, it is about using play dough to make electrical circuits.
(Given a few days, I’m sure I can justify the e-learning bit by connecting my circuits up to an arduino board or make makey.)
This is what you need
- Some conductive and some resistant play-dough (you make this yourself, recipes to follow)
- Some sort of output device that will be activated by an electric current (LED are good to start with but could be a buzzer or small electric motor)
- A battery. (our preference is a 4x AA battery unit delivering 6v but you can try other sorts)
- Some bits of wire
- A board or flat surface on which you can roll the play dough and build your circuit
Making the play dough
You are going to make 2 types of play dough. The regular play dough is made with salt and conducts electricity so we have called that the conductive play dough. The other batch is made with sugar and is less conductive. It is not, strictly speaking, an insulator because it does conduct electricity to an extent but it is far more resistant than the salt dough so we are calling that insulating dough.
Conductive play dough
I cup flour
1/4 cup salt
3 tablespoons cream of tartar (important – without it the dough goes slimy over time. Or lemon juice works pretty well if you don’t have any)
1 cup tap water
1 tablespoon vegetable oil (to stop dough going crumbly and drying out)
few drops food colouring
Mix the dry ingredients, add the liquid ingredients, including colouring, and mix well together. Heat gently in non-stick pan stirring all the time with a spatula until it ‘sets’ into a dough. Knead it on a board with more flour if necessary so that it has the right ‘doughy’ texture.
1 cup flour
1/2 cup sugar (caster sugar is best as it is less gritty)
1 teaspoon granulated alum (optional – it just acts as anti-bacterial agent. Small kids won’t try and eat the salt dough because it tastes nasty. This dough is sweet.)
3 tablespoons vegetable oil
Food colouring.
1 tablespoon de-ionised / distilled water (you can use tap water – it won’t be quite as good because tap water is a good conductor)
Mix dry ingredients, then wet ingredient and heat gently stirring all the time. Add more water as necessary (preferably de-ionised) from a spray bottle if you have one. You only need to add tiny quantities at a time. Keep kneading the dough on a floured boat until it is the consistency of modelling clay
Roll two sausages of conductive play dough. Connect one to each terminal of the battery. Press the ‘legs’ of an LED apart and stick one leg in each sausage of dough. (LED are directional – the longer leg should be connected to the positive pole. If the light does not come on, swap the legs around!)
Make simple switch by pulling a flap from one piece of dough and touching the other piece of dough. The light goes out (electricity will take the path of least resistance, which is to go through the dough not the LED)
Then try replacing one conductive sausage with a sausage of insulating dough. What happens?
Then try putting the insulating dough between the sausages of conductive dough and see what happens. Try the LED in each sausage in turn and across 2.
Then make spirals, cubes, one sphere inside another etc etc. Can you make a squishy monster whose eyes light up? can you make a birthday cake for someone?
How much of the underlying science you explain is up to you and the age and learning history of the children.
http://courseweb.stthomas.edu/apthomas/SquishyCircuits/videos2.htm
For older children, you can connect an arduino board into the circuit.
Or try demonstrating how potentiometers work by stretching the sausage. What is the diameter and length when the LED goes out?
Take an LED of each colour and wire each up to a conductive sausage of the same colour and a battery to make 3 circuits. Wind a cable tie around the heads of the 3 LED so that they make a triangle and hold them so that they are horizontal. Put a sheet of translucent plastic (tracing paper works OK) in front of the LED so that when you look from the other side of the paper you can see 3 overlapping circles of light (with white in the middle, obviously). break one sausage (e.g the green one) and see how the light changes to purple. Or stretch the blue one and see the light getting ‘warmer’ and yellower. Explain how pixels work.
http://courseweb.stthomas.edu/apthomas/SquishyCircuits/videos2.htm
Make 3 concentric circle of dough with the insulating dough in the middle. Connect the LED across the insulating dough rings. Add more and more LED in a circle. Talk about connecting in parallel vs connecting in series.
Safety
Absolutely safe. Worse case scenario is that a child connects LED straight to the battery, in which case it will blow and may shatter but this is unlikely.
Or they might connect the battery wires to each other – not dangerous but not good for the battery!
One last point, give the LED etc a wipe down after each use because the salt in the dough corrodes connectors after while.
Store the dough in a polythene bag and squeeze air out before sealing,
Thanks to AnnMarie Thomas at Maker Ed for some of these ideas. BTW – it is her daughter in the picture above!


 English
 Nederlands
 Deutsch
 Italiano
 Español
 Português
 Română
 Cymraeg
No comments yet.