
 Very excited to be the owner of a Raspberry Pi – a truly wondrous device with huge potential in the classroom. I was rather hoping I could use it in primary schools, but having battled with it for about a week with when it first arrived, I’d probably only use it it with 13-14 yr olds or older.
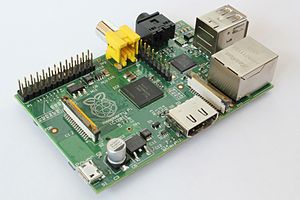
For those of you who are wondering whether Taccle2 is turning into bakery, the Raspberry Pi is a credit-card-sized single-board computer developed in the UK by the Raspberry Pi Foundation with the intention of promoting the teaching of basic computer science in schools. If Michael Gove gets his way and makes programming compulsory in the ICT curriculum then this is the way to do it.
However, it is not for the faint hearted. My passion for using e-learning tools with kids does not actually involve poking around bits of hardware or anything involving yards of electrical string and which looks as if it might need a screwdriver. Even the sight of the mixing deck when we do internet radio sessions with kids makes me feel queasy. So I am guessing that anyone who is even half-way geeky could probably set it all up in half an hour. For those who are like me, read on!
Firstly, you need to get your hands on one. This is not as easy as it sounds – the main suppliers had / still have waiting lists but these are disappearing. Shop around – the prices, especially for bulk orders, vary a lot. If you want to do it the easy way, The Raspberry Pi Foundation opened the “Pi Store”, as a “one-stop shop for all your Raspberry Pi (software) needs”.
Secondly, your raspberry pi arrives looking disturbingly fragile and unclothed. It isn’t – I dropped mine twice and it remained unscathed, which was quite comforting when I thought of the 14 yr olds I was planning to use as a test bed. They are also prone to dust (at least, in my house they are) so you will have to think about finding something to put it in. You can now buy them with little plastic cases but I was convinced part of the fun was in making a box to put it in. Given my aversion to screwdrivers etc, maybe this was a bit rash. However, I did manage to make one fairly easily out of lego. The only problem was that I had a limited range of lego block sizes (and a very limited capacity for design and technology) so my finished box could have housed a small mainframe.
Thirdly, you have to root around for lots of extra stuff to set it all up. This took the first 3 days. You need –
- A power supply (phone charger or micro usb adapter)
- USB mouse
- USB keyboard
- Ethernet cable
- SD card (Minimum size 4Gb; class 4 )
- SD card reader
- a display of some sort (monitor, TV or HD telly)
- Depending on above….HDMI to HDMI cable if you are using an HDMI TV or monitor with HDMI input monitor or if your monitor or telly has DVI input, an HDMI > DVI converter. If you are using an analogue display, then you need an RCA video lead and a separate audio lead.
- A powered USB hub is also useful because the Pi’s USB connections will be filled with a keyboard and a mouse and they take a lot of power from the usb ports
- An ethernet cable is handy because it makes getting new software for your Pi much easier
One of the most important things is to MAKE SURE YOUR CHARGER PROVIDES MORE THAN 700mA AT 5V. More than this is OK, less is definitely not OK. Needless to say, mine didn’t and it took another 3 days to sort that one out. I assumed that all mini usb chargers were the same. Wrong. The one I was using (for a phone) was 3.5 or something. The really bad news is that it worked a little bit. Now you would think that if it wasn’t delivering enough charge it wouldn’t work at all but annoyingly, it DID work but didn’t do what it was supposed to do.
I also referred to http://learn.adafruit.com/adafruit-raspberry-pi-lesson-1-preparing-and-sd-card-for-your-raspberry-pi/making-an-sd-card-using-a-mac. I found it harder to follow than on video but some of you will prefer written instructions and these were the clearest I could find.


 English
 Nederlands
 Deutsch
 Italiano
 Español
 Português
 Română
 Cymraeg
No comments yet.